Hygienic handles are grips for guards, doors, hoppers and removable machine parts designed so that product residue and microorganisms cannot settle on or around them. A hygiene lock (hygienic latch) applies the same rules to the parts that secure those doors and covers. Both are touched by gloved hands that carry product, and both are cleaned every shift – which makes them one of the most frequent contamination routes on an otherwise well-designed machine.
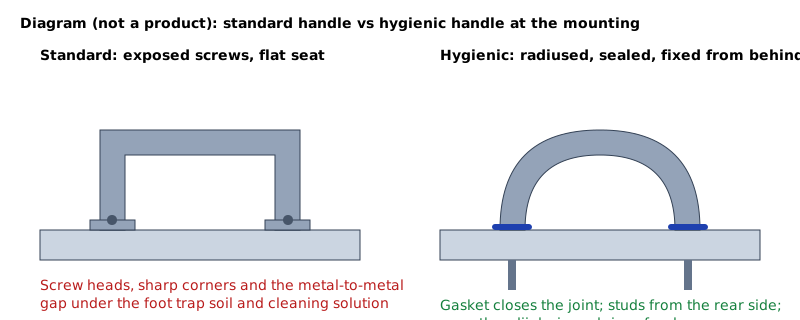 standard handle vs hygienic handle mounting. Schematic, not a product test report.
Handles and locks belong to the same family of fittings as hygienic bolts and sanitary fasteners and stainless steel spacers and spacer nuts.
Standard vs hygienic handles and locks
| Feature | Standard handle / lock | Hygienic handle / hygiene lock |
|---|---|---|
| Profile | Flat faces, sharp corners, recesses | Rounded, self-draining profile, generous radii |
| Fixing | Visible screw heads or nuts on the front | Fixed from the rear (studs or blind threads) or welded |
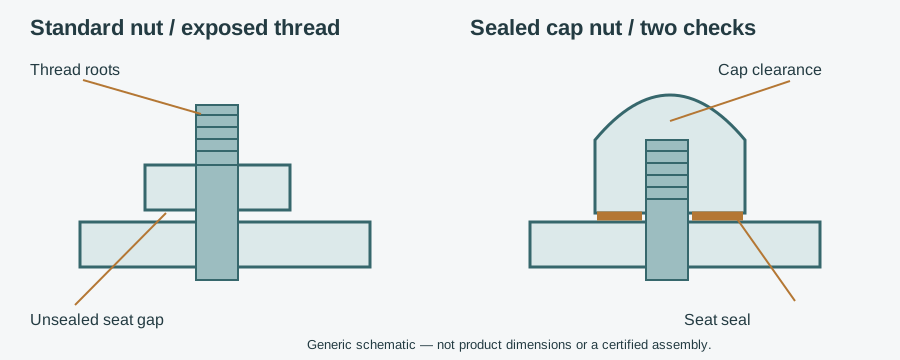
| Joint to machine | Metal-to-metal seat leaving a gap | Gasket or O-ring that closes the joint |
| Lock mechanism | Open slots, exposed springs and pivots | Closed body, no open slots reachable by spray |
| Material | Zinc die-cast, painted steel, unspecified plastic | AISI 304/316L stainless or declared food-contact plastic |
| Surface | Cast or painted, may chip | Polished or blasted finish with a stated Ra |
| Documents | Usually none | Material certificate, food-contact declaration, design certificate if certified |
Harborage points (harbourage points in British English) are places where residues and microbes survive cleaning. On handles they are almost always at the mounting: under the foot, around screw heads and in the gap between a lock body and its cam.
Send your application data and get a handle or lock recommendation
Design features that matter
Crevice-free mounting
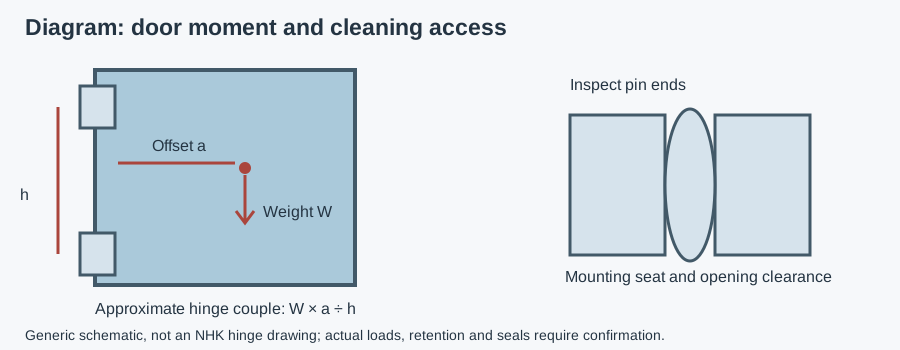
The other side of the opening needs hinge pin, seat and door-load checks as well as a cleanable handle.
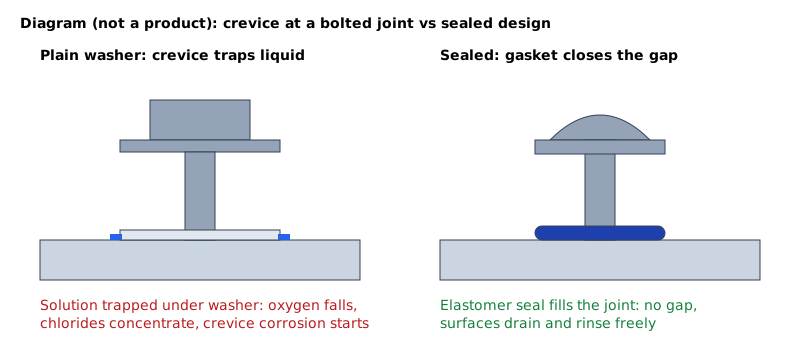
A crevice is a narrow gap that liquid can enter but cleaning cannot reach. Even a well-polished handle becomes a harborage point if it sits on a flat seat with a 0.1 mm gap. Hygienic designs close that gap with an elastomer seal that is slightly compressed when the fixing is tightened, and they keep the fixing on the rear side of the panel. Where the panel has no rear access, a sealed hygienic bolt with an integrated gasket is the alternative – see the crevice at a bolted joint for the principle.
Profile and radii
Surfaces should drain: no horizontal ledges, no undercuts, no inside corners tighter than the cleaning tool or spray can reach. EHEDG guidelines recommend internal radii of at least 3 mm on product-contact surfaces where possible; apply the same thinking to splash-zone hardware. Hollow tubular handles must be fully welded and closed – an open or pin-holed tube fills with water and soil.
Surface finish
EHEDG guidance gives Ra ≤ 0.8 µm for product-contact surfaces. Handles are usually in the splash zone rather than in product contact, but a finish in that range still shortens cleaning time and makes residue visible. Ask for the stated Ra; "polished" alone is not a specification.
Hygiene locks and latches
The mechanism is the hard part. A lock needs moving parts, and every moving part has a clearance. Hygienic locks keep that clearance inside a closed, sealed body, with only a smooth actuator outside. Avoid quarter-turn locks with open key slots in wet zones unless the slot is self-draining and reachable by spray. Spring-loaded latches should have the spring enclosed, not wound around an exposed pin.
Material choice
| Condition | Typical choice | Reason |
|---|---|---|
| Dry or occasionally wet non-contact area | AISI 304 | Adequate corrosion resistance, lower cost |
| Daily foam and rinse, chlorinated cleaners, brine, meat or fish | AISI 316L | Molybdenum improves resistance to chloride pitting (local corrosion caused by chloride ions) |
| Low impact, need for color coding, weight sensitive | Engineering plastic with food-contact declaration | Light and corrosion-free; check impact, cold and chemical limits |
| Lock internals | Same grade as body, sealed | Avoid mixed metals and hidden corrosion |
Do not combine a 316L handle with zinc-plated screws: besides rusting, mixed metals in a wet joint invite galvanic corrosion. The grade trade-off is set out in AISI 316L vs AISI 304 compared in practice. After machining or welding, stainless parts should be passivated (chemically treated to restore the protective oxide layer).
For gaskets, check elastomer compatibility: EPDM tolerates hot water and many alkaline cleaners but swells in fats and oils; FKM resists fats and many acids; VMQ (silicone) covers a wide temperature range but is mechanically weaker.
Selection method
- Define the zone: product contact, splash zone (surfaces that product or cleaning spray reaches) or non-contact.
- Define the cleaning regime: dry cleaning, foam and low-pressure rinse, high-pressure washdown, or COP (cleaning out of place, parts removed and washed).
- Choose material from the table above, including gasket elastomer.
- Choose mounting: through-hole with rear nut, rear studs, blind tapped hole or welded. Check panel thickness and rear access.
- Check ergonomics: grip clearance for gloved hands (cut-resistant gloves add bulk), force needed to open, and whether the part is pulled, pushed or used to lift.
- For locks: confirm the required function (latching only, locking with tool, interlock with a safety switch) and that the mechanism stays enclosed.
- Request documents: material certificate, EC 1935/2004 declaration where contact is possible (EU 10/2011 for plastics), and the certificate of the specific design if certification is required.
Example (assumptions, for method only): a stainless guard door on a poultry deboning line, foamed and rinsed daily with chlorinated alkaline detergent at about 60 °C. The door has no rear access at the hinge side but full access at the handle. Choice: 316L bow handles fixed with rear studs and EPDM gaskets (no fats on the outside of the guard); a closed-body latch in 316L; hinges with enclosed pins. The safety interlock is a separate sealed switch, so the latch does not need to carry the interlock function.
Installation and inspection
- Clean and degrease the panel surface before fitting; a gasket on a dirty seat leaks from day one.
- Tighten to compress the gasket evenly, not to crush it – an extruded gasket leaves a new crevice.
- Do not add sealant beads as a "fix"; they crack and become harborage points.
- Inspect weekly in wet zones: gasket edges, discoloration (tea staining) at the joint, residue behind the foot, play in lock mechanisms.
- Replace gaskets when hard, cracked or discolored, and handles that have been bent – a bent foot no longer seats on its seal.
Before accepting the installation, work through the mounting drawing with maintenance and the people responsible for cleaning. Identify the handle, lock, fixings and gasket by their supplied part codes. Compare those codes with the requested material and cleaning documents; a declaration for another gasket or handle is not evidence for the fitted assembly. Record any unanswered supplier questions rather than assuming an equivalent-looking replacement has the same limits.
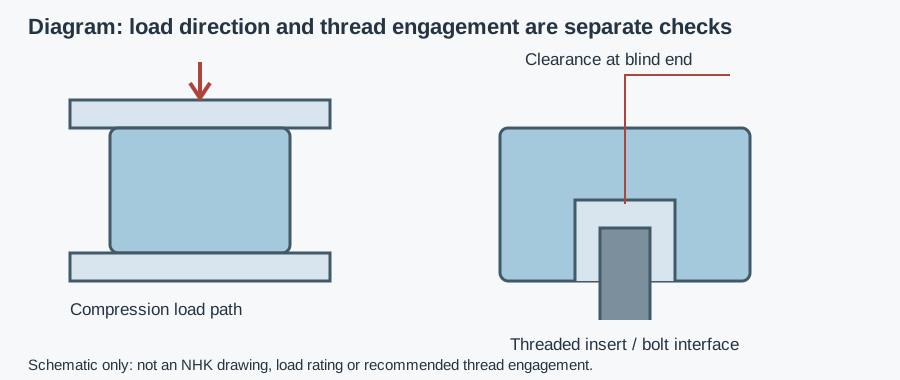
With the machine isolated and the door safely supported, check the mounting seat from both sides where accessible. Look for an uneven gasket edge, exposed thread, trapped residue and interference through the intended opening movement. Confirm that a gloved hand has the required clearance without contacting nearby fittings. For a lock, check its intended latching function separately from the machine's safety interlock; do not alter or bypass the interlock to obtain a better handle position.
After the approved cleaning procedure, inspect the foot perimeter and accessible lock surfaces for remaining soil or retained liquid. Record the observations, fitted parts and any corrective work in the handover. If access is inadequate, resolve the mounting or cleaning method before acceptance rather than simply tightening the fixing again.
Common failure modes
- Black residue at the handle foot: gasket missing, crushed or chemically attacked.
- Rust spots on stainless handles: carbon-steel contamination from tools, or 304 in a chloride environment.
- Latch that sticks after cleaning: detergent or soil dried in the mechanism – a sign it is not closed.
- Cracked plastic knobs: impact or cold embrittlement; a foreign-body risk.
- Mold behind handles on painted panels: water trapped under a flat foot.
Other small hardware fails in the same ways; standard parts in hygienic design shows where a catalog part is acceptable and where it is not, and EHEDG components and parts in food production covers bolts, nuts and knobs.
What to send for a recommendation
For any claimed hygienic certification, use the checking the supplied handle and lock certificates before relying on it in the specification.
- Part type: handle, knob, hinge or lock, and quantity per machine
- Zone and cleaning method; chemicals and temperature
- Preferred material and gasket, mounting method, panel thickness
- Lock function (latch, tool-operated, interlock)
- Documents needed; delivery country
An NHK technician suggests a matching component and sends a quote. To browse, see NHK's hygienic machinery components in stainless steel and the EHEDG and 3-A standard components line.